Furling the genoa
Furling a genoa when it is not needed has the advantage of:
Creating a calmer situation in stronger wind conditions, particularly for the novice or more nervous type of sailor.
Reducing wear and tear in the sail material, caused when the sail is allowed to flog.
Increasing vision in confined or busy areas of water.
Advantages of using an Aero spar to connect the furling drum and top swivel:
Provides a rigid link between the top and bottom furling parts and is far more efficient than using the luff wire only, which has no torsional rigidity, and causes the wire to develop a permanently deformed twist. Allows the genoa to be furled efficiently in any strength of wind. (In stronger wind conditions using only the luff wire, the top of the sail tends not to furl properly, leaving the upper area of sail to flog). Allows the genoa to be reefed to suit the wind conditions and matched to any reduced size of a reefed mainsail. A spacing disc (to separate the forestay from the genoa luff*) is included with the Aero Furling Spar, and the Aero Luff Spar when supplied complete with the genoa and furling kit. A spacing disc can be bought separately for any order of the Aero Luff Spar only. The disc is made specifically to fit the RWO (R2080), Selden (Furlex 20s), or Harken (162 & 164) top swivels, and only the name of one of the above makes need be provided. *The forestay needs to be kept apart from the genoa luff sleeve whenever the sail is furled to prevent the two becoming tangled, which immediately stops any further furling of the genoa.
| 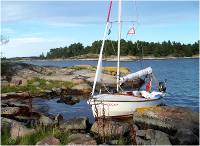
Moored up at an idyllic landing spot on Sweden’s east coast south of Stockholm.
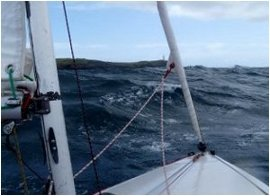
Rounding the south-eastern point of the Swedish coast at Torhamn in F.5 gusting F.6 winds under reefed main and matching reefed genoa.
Sailing the southern Irish coast in F6 wind conditions with a double reefed main and completely furled genoa using the Aero Luff Spar system.
|
|
Back
|
Reefing the genoa
A spar must connect the bottom drum with the top swivel for a furling system to be used as a reefing system With only a luff wire connecting the drum with the top swivel, pulling on the genoa sheet will partially unravel the furled peak of sail, since whilst the cleated furling line will prevent the drum from rotating, the highly flexible luff wire does not prevent the top swivel from turning.
|
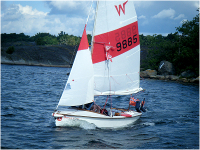
Spree Lady setting off from Järnavik at the Swedish Wayfarer International Rally 2012.
|
|
Back
|
The complete reefing process
The information below is a re-write of the text of the reefing process for the updated 5th edition of the Wayfarer Book, from which the editor based the current section in the book. | |
|
|
|
Back
|
Reducing the sail area
A simple and quick method of reefing is virtually essential for any cruising or day sailing boat. It is poor seamanship and potentially dangerous to sail with an overpowered sail area, and always best to reef whenever the wind is strong enough to start testing the skills of the helm. The possibility of capsizing should to be avoided at all costs when pleasure sailing, since unlike racing, there isn’t usually a safety boat on hand to offer assistance or rescue.
|
|
Back
|
Choice of mainsail reefing
There are two main ways of reducing mainsail area: slab reefing and roller reefing. Reefing systems should always be kept as simple as possible. It shouldn’t take longer than 2 minutes to put in a reef, and with practice and an efficient system, it is possible to get the time down to under a minute. Slab reefing is the recommended method as it’s quick and easy to carry out, with the reduced sail area working in conjunction with the standard mainsail control systems of the kicking-strap and centre mainsheet.
The alternative system of roller reefing the mainsail around the boom is not possible where a centre mainsheet system is used. It also requires the kicking strap to be removed and replaced with a makeshift strap rolled in with the sail. The whole process is far less easy to carry out in stronger wind conditions afloat, takes considerably longer than slab reefing, and the resultant sail shape is invariably poor since the normal sail control mechanisms cannot be used to adjust the sail in any way. Roller reefing therefore has little to recommend it as the principle method for mainsail reefing.
|
|
Back
|
Mainsail reefing points
(Note: photos are being prepared to illustrate the various points made below)
It is best to take out a reasonably large area of mainsail when conditions make reefing advisable. A recommended set-up is to have the reef points around 1 metre and 2 metres above the foot (for a mainsail with a luff length of around 5.6 metres). Day sailors may decide that fitting just a first row of reefing points is sufficient, since they are unlikely to go out in conditions that would require 2 reefs to be put in the main.
It is advantageous to make the leech reefing point 100mm higher than that at the luff so that the boom is raised slightly higher over the crew's heads in the stronger wind conditions. If the first reefing point is put in immediately below the first batten, it will save having this pocket angle changed. The second reefing point will come above the lowest batten and will require the lower batten pocket to be re-aligned to run parallel to the rows of reefing points, or a second, alternative batten pocket to be added. Four small cringles spaced along the sail for the reefing ties are usually sufficient to tidy the first reef, with three such cringles sufficient for the second reef.
The simplest system for the reefing ties is to use lengths of shockcord (around 450mm) with Tyga Ties (shockcord cleats) one side of the sail (Fig. 1), and a plastic stopper on the other side to hold the shockcord in place (Fig. 2). It is recommended that the Tyga Tie cleats for the first or second reefing points are put on the same side of the sail as that particular reefing line on the boom, so that they will be immediately to hand during the reefing process. The tails should then be hanging down below the boom on the other side, making them easy to access. An older system was to use a continuous length of shockcord with hooks threaded through the line, but the drawback with this system is that the hooks on the shockcord line invariably catch in the various fittings on the boat as the sail is being hoisted.
|
|
Back
|
Rope for the reefing lines
It is recommended that a 5mm diameter low stretch, easy to grip pliant rope is used for the reefing lines. Two reefing lines (one for the clew, and another for the tack) are recommended for each row of reefing points (rather than one continuous line for both clew and tack), and it is advisable to use a different colour rope for each set of reef points.
|
|
Back
|
The Leech reefing line
The leech reefing line is initially anchored to the boom, passed up and through the leech reefing cringle, back down to a block on the other side of the boom, and then forward along the boom to a cleat mounted somewhere not far from the gooseneck of the mast. The anchor point and block on the boom should be fixed so that the leech reefing line makes an angle of about 45° between the sail cringle and the fittings on the boom, pulling the clew reefing cringle both down and back (Fig. 3). This position is best found by using an adjustable boom slide on the underside of the boom. If this is done prior to drilling holes in the boom (should it be preferred to have these fittings fixed), it will likely save finding that the fittings are not in as ideal a position as first thought – a situation that happens only too easily.
Itemising the set-up in greater detail:
One end of the reefing line is secured, (preferably spliced) to the boom slide or an eye secured to the boom. The line is fed in and out through 2 cringles in the leech of the sail (Fig. 4) – this will keep the flap of sail taken out by the first reef tidy – and through the first leech reefing cringle. (The smaller ‘sail tidy’ cringles are not quite such a useful feature for the upper leech cringle of the second reef). The line is led back down to the boom block that is secured via a twisted shackle (Fig. 5), or lanyard (Fig. 6) to a boom slide; or a block secured to the boom (Fig. 7) – which also shows the lines being fed through the boom to keep them secure and tidy as an added refinement; or (with a modern boom end fitting) led to the back of the boom via a pulley block (Fig. 8) and through the boom end block.
(Note in Fig 8 the hook system used on both the reefing line and the clew outhaul to enable these to be quickly attached when rigging the boat).
The line is then led through something on the boom – like the spinnaker pole catcher (Fig. 9), to stop the reefing line sagging when not in use. And finally forward to a cleating arrangement near the mast – around 450mm from the gooseneck – either on the side of the boom as (Figs. 10 & 11), or beneath the boom (Fig. 12), which enables the sail to be more easily reefed from either side of the boat. These cleats should be situated on the boom such that the crew can carry out the reefing process standing entirely in front of the thwart. (Note the cleatkeepers in Fig. 10, which not only provide the cleat with added security, but more usefully prevent the line catching in the cleat unwontedly whenever the reef is being taken out the main. Also the small bag in Fig 12 attached to the boom by means of self-adhesive Velcro strips that will keep the reefing line tidy when not in use).
|
|
Back
|
The Tack reefing line
Various methods exist to secure the tack reefing line to the boom and/or mast. It is possible to use the Cunningham, if fitted, or a second reefing line to pull and secure the tack in place (the green and red lengths of rope in Fig. 10). If however a similar type of cleating system to the leech system is used (Fig. 13), a cheek block must be added after the cleat for the pull to be downwards, since pulling the luff line back is also likely to pull the boom out of the gooseneck. An additional advantage of passing the reefing line through a block after the cleat is that the line will automatically jam in the cleat as it is pulled downwards.
Fittings for a luff reefing line can also be fixed on the mast, rather than the boom, offering the advantage of a better angle of pull for the luff line and hence better tension along the foot of the sail. A side entry cleat (Fig. 10) provides the simplest and quickest means of cleating the luff reefing line on the mast. It is however necessary to release the luff line from the side entry cleat when lowering the reefed mainsail and removing the boom from the gooseneck.
An alternative arrangement is to use a hook fitted onto the side of the boom, over which the luff reefing cringle is secured, or a 'cowhorn' fitting to replace the pivot bolt in the gooseneck. Another possibility is to use a small stainless steel hook fitted onto the boom tack pin (Fig. 13). These methods save using a length of line, though an open hook is not a particularly user-friendly fitting for a small boat. The first hook system mentioned also has the disadvantage of exerting a pull on one side of the boom, resulting in the boom being slightly twisted.
|
|
Back
|
How to reef
As reefing should always be carried out when wind conditions start testing the skills of a helm, it shouldn’t need to be done as an urgent operation. However it is wise to have the necessary skills to reef quickly, in case a more urgent situation such as an unexpected squall arises. Should this situation be experienced, it is only necessary to secure the new tack and leech reefing points for the sail to be fully reefed. The excess sail may flap around untidily – and it would be more seamanlike to roll this up and secure it as and when a suitable opportunity permits – but it is not essential. It is advisable to take the boat out on a quiet day and practise until the reefing process becomes an entirely smooth and simple operation.
Reefing is best done whilst sailing on a reach, with the helm in full control of the boat, leaving the crew to carry out the reefing operation. Reefing can also be carried out whilst hove-to, though for this situation it is necessary to ensure there is sufficient sea-room to allow for the few minutes of drifting. It is also advisable to furl or take down the genoa first as either backing this sail, or allowing it to flog, will increase the amount of drift during the reefing process.
The mainsail reefing process always starts by easing the kicker right off as far as it will go (or releasing it from the boom or mast, in which case a simple clip-on system is recommended). Pull the leech reefing line to the limit of the kicker travel, (or until the first reefing point is reached if this is possible). Ease off the main halyard and lower sufficient sail to bring the boom horizontal again. (Care should be taken not to release the halyard completely, thereby allowing the boom to drop down into the boat – or worse, the water). Repeat the process until the first reefing point is reached and cleat the leech reefing line. Release the main halyard further until the first reef luff cringle is level with the top of the boom and can be attached by means of a line or hook. Re-tension the main halyard as necessary, check the leech reefing line is completely tight and replace or tighten the kicker. The spare rope of the two reefing lines can be coiled and placed in the loose sail, which can be rolled or folded up along the boom, with the lengths of shock cord ties being hooked up as far as the crew can reach in safety and comfort.
Where the ‘sail tidy’ cringles have been included in the leech reefing line set-up for the mainsail, this should be quite sufficient to keep the loose sail of the reef completely tidy. If however there is opportunity to complete hooking up the remainder of the shock cord ties, then care must be taken to pass the tie between the boom and the mainsheet (for a centre-main system) in order not to ‘trap’ the mainsheet in the tie, thereby restricting its movement.
The helm can retain full control of the boat during the above operation. He/she will need to ease the mainsheet to allow the boom to rise when the leech reefing line is being tightened, and will need to pull the sheet again when the main halyard is released to lower the boom back to its original height, but should still have full control of the boat even when the mainsail in its ‘scandalised’ situation.
Taking out a reef is the reverse of the sequence described above, and can also be done whilst sailing. Release the sail ties; free off the kicker; release the luff reefing line and hoist the mainsail; secure the main halyard; release leech reefing line; tighten kicker. It will be noted that the reefing process – either putting one in or taking it out – is speeded up considerably by having a kicker arrangement that allows the boom considerable vertical travel.
To summarise of the reefing procedure:
Reduce headsail area. Sail on a reach to have the boat under control during reefing process, or allow sufficient sea room for drift if lying-to.
Release or detach kicker. Tension the leech reef line as far as the released kicker allows, thus raising the boom. Where the kicker arrangement does not allow sufficient travel for the operation to be carried out in one go, repeat this process (by partially releasing the main halyard), until the leech reefing line is fully secured. Release the main halyard and secure the luff reefing cringle by tensioning the luff reefing line or clipping it onto a hook (depending on system used). Re-tension the main halyard and check the leech reefing line is fully tensioned. Tighten or re-attach the kicker. Tidy the excess reefing line tails and place in either the rolled up loose sail, or a boom bag and secure the excess sail with shockcord ties.
|
|
Back
|
Sailing with a balanced Rig
There is little point in reducing the mainsail by more than the 2 metres or so of the 2nd reef, as this would make sailing to windward very inefficient in strong wind conditions due to the considerable leeway that would be made. In these circumstances, it is better to take the mainsail down altogether and set sail on foresail only to a safe haven somewhere downwind.
It is essential to sail with a balanced rig. After reefing the main, the area of foresail must be reduced by a corresponding amount. With any mainsail reefing system therefore, it is either necessary to carry a smaller foresail, or have some sort of foresail spar system to reef the genoa.
Putting a reef in the main without reducing the area of foresail results in the boat rig being dangerously unbalanced – with the boat tending to bear away from the wind, rather than head up into it. It also makes the process of tacking more difficult in stronger wind conditions.
Most dinghies will sail perfectly well on mainsail only, and when beating to windward in strong winds with no smaller foresail available than a genoa, it is advisable to sail without the genoa at all. The resulting lack of rig balance will at least result in weather helm, making the boat turn more readily into wind. It is possible to counteract this to some extent by raising centreboard to around half depth, bringing the centre of lateral resistance of the boat aft to help offset the unbalanced rig.
Whenever difficulty is experienced in tacking through the wind, the foresail can usually be backed to help complete the manoeuvre, and for this reason, it is always best to have some sort of genoa reefing system so that this can be achieved, even with the smallest amount of foresail. In a situation where the foresail has been taken down however, it is helpful to be able to know how to sail backwards, as reversing the rudder will often help to complete the tack.
Sail balance is not so critical when sailing off the wind. Quite atrocious wind and sea conditions can be considerably calmed by taking down the mainsail, and sailing downwind on genoa or jib only. It is therefore recommended when (coastal) cruising to always plan some downwind refuge run to, should this become necessary.
Should it be necessary to take the mainsail down, it is feasible to sail either a dinghy or small sailing craft with a proportionally large genoa on this sail alone, even gaining to windward as far as a close reach. It is however necessary to first gain boat speed off the wind to provide forward motion, before gradually turning as close as possible toward to the wind.
|
|
Back
|
Genoa furling and reefing defined
It is helpful to clarify the difference between genoa furling and genoa reefing. A genoa furling system will roll the foresail around the luff wire to wrap it tidily out of the way once hoisted. This is primarily used to prevent the sail flogging, which can be both a nuisance and damage the sail fabric. Furling systems are extremely useful for such situations as launching, coming into land, and anchoring, as it keeps the foresail both quiet and out of the way to give clearer vision.
A genoa reefing system will roll the foresail around a tube or reefing spar by any amount that is desired, thereby enabling the sail to be adjusted to the size best suited for the wind conditions. The control mechanism for either system needs to be led back in such a way as to be simple for the crew (or helm if preferred, particularly for single-handed sailing) to cleat positively, so that there is no likelihood of the sail unfurling unintentionally.
|
|
Back
|
Genoa furling
Although genoa furling is an extremely useful way of quickly tidying the foresail, sail makers do not generally recommend this method for high quality sails, since it tends to damage the sail material, particularly at the luff of the sail, where it is wound tightly around the luff wire.
Sailing with a reduced foresail area by furling the genoa can only be done successfully when sailing off the wind; preferably with the sail material wet and the genoa well furled with a number of turns. In this situation, there is often sufficient grip between the layers of sail cloth to prevent the top of the sail from unfurling.
If sailing to windward with a furled foresail is attempted, the tension required on the jib sheet to pull the sail in unwinds the top of the genoa, causing the top section of the sail to flog. This part of the sail cannot then be re-wound without releasing the furling line completely and subsequently re-furling the sail. Even this can be a problem facing into a strong wind, since the top part of the sail tends not to furl properly (with the luff wire not having the rigidity needed to turn the top part of the sail), leaving a small upper section of sail to flog. The best way to furl the sail in these circumstances is to turn off the wind temporarily onto a near run – being careful not to gybe. This blankets the genoa with the main, taking all the pressure out of the sail, which can then be quickly furled, before returning to the required course.
Care needs to be taken when choosing which way to turn the drum with the furling line when setting up a furling system, since the luff wire must be turned in the direction that will close the strands together, rather than open them up. Even turning the luff wire in the correct direction will distort the wire, which forms a permanent twist at the lower end by the ferrule.
Furling systems with an enclosed drum are strongly recommended since this eliminates the risk of the furling line coming off the drum and becoming wrapped around the forestay fitting at a critical moment – an experience most cruisers only endure once before changing to a closed drum system! The drum size diameter determines the thickness of furling line. All furling systems will take sufficient 2.5mm thickness of line to completely furl a genoa (with 16 to 18 turns). Systems with larger drums will take a more comfortable 3mm thickness. Recommended closed drum furling systems with stainless steel bearings are available from RWO (single row), and Selden (double row), with Harken using multiple stacked ball races of Delrin® or Torlon® bearings.
Any slackness in the forestay causes it to become wrapped into the genoa luff during the furling procedure. This quickly prevents any further furling of the foresail. It is therefore essential to keep the forestay fully tensioned, with the easiest method of ensuring this being to bring the forestay line back to a cleat (Fig 14) for the crew (or helm if led back to this position) to re-tension should any adjustment be made to the genoa luff tension. It is also advisable to fit some sort of spacer, like a disc or triangular plastic distance piece. An off-cut of plastic can usually be obtained from a hardware shop, which can either be cut into a disc shape with a hole of a suitable size to fit over the upper part of the top swivel, or cut into a triangular shape with jib hanks fitted at each of the three corners. The length (from base to apex) of a triangular plastic piece needs to be around 150mm and the height about 130mm. The apex of the triangle is best attached to the forestay, with the base attached to the genoa halyard. A hole drilled in the plastic through which a short length of shock cord can be attached between the plastic and a fitting at the entry point for the jib halyard on the mast will keep the triangular plastic spacer up at the top of the forestay.
|
|
Back
|
Genoa reefing
A tube, or reefing spar, is used either to replace or encase the luff rope or wire. When the bottom-furling drum is turned therefore, the top swivel, (being directly connected), is also turned. This ensures that the sail is furled consistently along its length, and more importantly, when the sail is partially furled, any tension on the jib sheet will not unwind the top part of the sail; thus enabling the genoa to be effectively reefed by any desired amount. It is advisable to fit extra sets of telltales on the genoa, further back from the luff, so that when the genoa is reefed, a set of telltales will still be visible to indicate the performance of the sail.
A reefing spar can (depending on its diameter), affect the flow of air over the leading edge of the genoa. Great care must be taken not to bend an aluminium spar, since it will be virtually impossible to straighten perfectly again. This can make transporting this type of spar less simple, as well as complicate hoisting the foresail somewhat. The weight of some systems can also be a slight disadvantage when sailing.
Ralph Roberts. Dec 2012.
|
|
Back
|